I’m just starting this course and realised it was using some outdated versions of software. Particularly, it’s running on python2 which is now deprecated. I saw the author’s notes of caution about using newer versions as they might not work, but I really did not want to use python2. I looked into this forum for potential answers but found none, so I did this setup on my own. I’m writing this question so I can post the answer for any people looking into how to do it in the future.
This comment contains the current versions of my stack and the installation instructions. I will update it as needed if something changes in the future.
Dependencies & versions
Ubuntu 20.04 LTS (all updates installed as of 22/03/2021).
Python 3.8.5.
MAVProxy 1.8.34 (latest version as of 22/03/2021).
ArduCopter 4.0.7 (latest version as of 22/03/2021).
Installation instructions
Ubuntu 20.04: Download the latest image from the official website, do a minimal installation, and upgrade all packages available.
sudo apt-get install python3-dev python3-pip
# Set python3 alternative in the system, as some tools like ardupilot’s waf try to simply use “python”.
# Replace the — ligature from install with a double dash '--'.
sudo update-alternatives —install /usr/bin/python python /usr/bin/python3 10
MAVProxy:
# Note that for MAVProxy, this package and all of its dependencies can also be installed through pip.
# I find using pip to be cleaner (keep the python dependencies within the python package manager).
# However, I did it as described bellow because those are the instructions provided by the Ardulink documentation.
sudo apt-get install python3-opencv python3-wxgtk4.0 python3-matplotlib python3-lxml python3-pygame
pip3 install PyYAML mavproxy --user
echo "export PATH=$PATH:$HOME/.local/bin" >> ~/.bashrc
Ardupilot
cd $courseRoot
mkdir apm
cd apm
git clone -b Copter-4.0.7 https://github.com/ArduPilot/ardupilot
Course progress
I have now finished the “Ardupilot and SITL introduction” section and all exercises work perfectly with these versions of the software. If I run into any issues in future lessons, I’ll update this thread with workarounds/fixes.
One of the videos of the DroneKit section is dedicated to installing virtualenv to manage conflicting versions of pymavlink, as the version we were recommended to install does not play well with the recommended version of dronekit-sitl. Well, I’m glad to report I do not have that problem in my setup. Here are the versions of my dependencies:
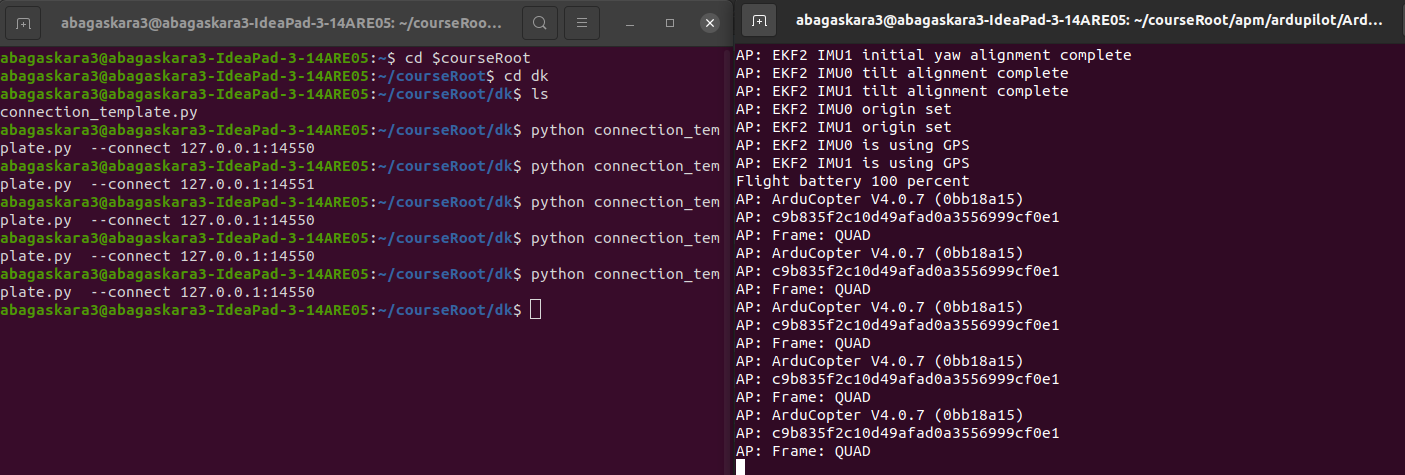
As we can appreciate, they are all the latest versions as of today, no need for special versions. This is the output I get when I run the connection_template.py script without a connection string, which makes it start a default dronekit sitl:
I actually do encourage everyone to use virtualenvs as it is a clean way to keep your dependencies controlled, but I’m glad to report no special provisions are needed to make dronekit-sitl work with my setup.
I have run into my first compatibility issues, as warned by Caleb. This is somewhat related to his video about virtualenv and the dependency conflicts. When running the script we wrote for the “Attributes part2” video, my script fails to set the SITL vehicle to ‘GUIDED’ mode. In fact, can’t setup vehicle.mode to anything other than the default ‘STABILIZE’. This issue is covered in the dronekit github issues, and they fortunately provide a simple answer. The problem is that pymavlink v2.4.9 and up has a known bug that fails to change a vehicle’s mode. Thus, downgrading this dependency to v2.4.8 does the trick. Here’s the code:
And that’s it! My code works well afterwards. To be fair, there’s likely more issues down the road, and following Caleb’s recommendation to downgrade in all dependencies might be the safest path, but I continue wanting to do this course with the latest available versions of the code.
I have finished the course, and the only other issue I encountered was in the Function to Control Yaw of Drone lesson. In the dummy_yaw_initialiser function, Caleb passes aLocation.lat*1e7 and aLocation.lon*1e7 to the message factory, and at least in my version of the system those values are wrong and I get an error about these parameters not being int, which is easily fixable by passing them as int(aLocation.lat*1e7) and int(aLocation.lon*1e7)
Thus, I conclude the entire course can be completed with Ubuntu 20.04 and Python3, following the instructions I provide in this thread.
Glad this has helped you. As you mention, I did do some changes to the scripts, since as you pointed out earlier, the Exceptions module doesn’t exists in python3. I think I would need a little more detail from what you are doing and what errors you are experiencing to help you debug, but it would probably useful to share my connection_template.py and launch_sitl.sh scripts, so I’ll paste them as comments below this.
The following is the content for the launch_sitl.sh file. I have it located in /usr/local/bin/launch_sitl.sh, and it’s called in the following way to test the connection_template: ~/courseRoot/dk$ launch_stil.sh connection_template.py
Finally, the following is my connection_template.py file. You can use it as the base for all your other scripts in this course by just adding the relevant logic in the indicated part inside the main() function. However, I suggest you read it and really try to understand it, or even write your own template file from it (for learning purposes).
When calling launch_sitl.sh, it should be done from the ~/courseRoot/dk folder and always inside the virtualenv that contains the correct pymavlink version.
File contents:
from dronekit import connect, VehicleMode, LocationGlobalRelative, APIException
import time
import socket
#import exceptions
import math
import argparse

def connectMyCopter(conn_str):
    if not conn_str:
        import dronekit_sitl
        sitl = dronekit_sitl.start_default()
        conn_str = sitl.connection_string()
    vehicle = connect(conn_str, wait_ready=True)

    return vehicle


def get_arguments():
    parser = argparse.ArgumentParser(description='commands')
    parser.add_argument('--connect')
    args = parser.parse_args()

    return args


def prepare_vehicle_for_flight(vehicle):
    print('Waiting for SITL vehicle to finish initialising...')
    time.sleep(5)

    while not vehicle.is_armable:
        print('Waiting for the vehicle to become armable')
        time.sleep(1)
    print('Vehicle is now armable')

    # Set the vehicle to guided mode
    print('Vehicle is in %s mode'%vehicle.mode)
    #vehicle.mode = VehicleMode("GUIDED")
    vehicle.mode = 'GUIDED'
    while vehicle.mode != 'GUIDED':
        print('Vehicle is in %s mode'%vehicle.mode)
        print('Last heartbeat:%s'%vehicle.last_heartbeat)
        print('Status: %s'%vehicle.system_status)
        print('Waiting for the vehicle to enter GUIDED flight mode')
        time.sleep(1)
    print('Vehicle is now in guided mode')

    #Arm the drone
    vehicle.armed = True
    while not vehicle.armed:
        print('Waiting for the vehicle to become armed')
        print('Last heartbeat:%s'%vehicle.last_heartbeat)
        print('Status: %s'%vehicle.system_status)
        print('Armed: %s'%vehicle.armed)
        time.sleep(1)
    print('Virtual propellers are now spinning!')


def set_and_get_params(vehicle):
    gps_type = vehicle.parameters['GPS_TYPE']
    print('GPS type: %s'%gps_type)
    vehicle.parameters['GPS_TYPE'] = 3
    gps_type = vehicle.parameters['GPS_TYPE']
    print('GPS type: %s'%gps_type)


def arm_and_take_off(vehicle, targetHeight):
    prepare_vehicle_for_flight(vehicle)
    vehicle.simple_takeoff(targetHeight)
    print('Taking off...')

    while vehicle.location.global_relative_frame.alt < 0.95*targetHeight:
        print('Current altitude: %d'%vehicle.location.global_relative_frame.alt)
        time.sleep(1)
    print('Target altitude reached!')


def main():
    args = get_arguments()
    vehicle = connectMyCopter(args.connect)
    arm_and_take_off(vehicle, 10)

    # Script logic goes here. Preferably a function call.


    vehicle.close()


if __name__ == '__main__':
    main()
I can confirm this install worked for me and could run the dk scripts. However, there seems to be some steps missing for anyone wanting to follow this exactly, eg, I use the ‘source’ command after changes to .bashrc, need to mkdir ‘courseRoot’, need to include the dk install.
Also, I could not get sim_vehicle.py going and I thought it was installed with the ardupilot install. So there must be another step I am missing.
You are right, these instructions are not the full setup, but rather the minimum changes required to the course instructions to work with python3. All other steps from the course are required, such as creating the directories, activating the virtualenv before calling the scripts, etc.
The main reason the curriculum is using python2 instead of python3 is to strive for software version consistency throughout all of the courses. We use ROS1 pretty heavily in the “Precision Landing and Drone Delivery” course, which can be a PITA to get working with python3.
In our next software version update, we will be aiming to get everything on python3.
Awesome stuff and love your guide for those wanting a jump on python3!
Presumably, you are using ROS1 in the last course to work the clamp? I have yet to finish the second course (but getting close), but by the time I get to the last one, I’ll give it a go to either use ROS2, or get ROS1 working with python3.
The script runs without error. However, in the terminal that i run the python script I didnt get the same vehicle returned like the video show (>>APM:copter v xxx >>frame : QUAD). Instead, all i got is this one (which i assume shows that the SITL has started)