Cannot Calibrate ESCs and Spin Motors Using Transmitter or MP

Hi,

I am a complete beginner and this is my first time building a drone by myself using the Drone Dojo. However, i have been stuck on the calibrating ESCs step for several days now. I have read all the other topics and questions posted here but none have helped me so far.

I have the following:

SIMONK30A NIMH: 5-12S LiPO: 2-4S ESCs
X6B Receiver
FS-i6X Transmitter
PixHAWK 2.4.8

Following the Drone Building Tutorial, i can do the following with the same beeps heard as in the video:

After binding the transmitter with the receiver with the wire going to PPM port on the X6B and the other end of it going to RC on the PixHAWK i do the following:

  1. I turn on the FS-i6X and turn the throttle all the way up
  2. I plug in the LiPo battery to the drone and press and hold the safety switch until its solid blue
  3. I disconnect the LiPo Battery
  4. I reconnect the LiPo Battery and press and hold the safety switch until its solid blue and i hear a long beep as in the video.
  5. Then i move the transmitter throttle down as instructed in the video and i am supposed to hear a tone, WHICH I DO NOT.
  6. Hence at this point moving the throttle up etc does nothing to the motor and nothing spins.

I face the exact same when i use Mission Planner to do the ESC calibration.
I have already flashed the latest firmware to the PixHawk using Mission Planner.

I have tried to do the ESC calibration with the red UBEC wire in all four ESC and also tried it with the red UBEC wire in only 1 ESC and removed from the other 3. I have not been successful.

Can someone please assist me as i feel like i have done the calibration a 1000 times to no avail.

I am attaching a video below that show the situation i am facing.

2 Likes

@jax200 could you kindly assist me with the above issue? Thank you.

2 Likes

I am not exactly sure since you seem to have tried various methods. So I’ll just throw out some ideas.

For hardware, you should troubleshoot to isolate if the problem is the transmitter, receiver, esc, motor, wiring or even the flight controller. I often swap out a component to see if it makes a difference, but in this case it seems to be a software issue.

For software, you should verify that you are using the transmitter sw setup correctly, and that you have uploaded the correct firmware to the flight controller. Actually, since this is an older flight controller, you might even try uploading an older firmware version if all else fails. I haven’t tried using the latest firmware on this flight controller if that is what you are doing. (The current developers would frown on this idea and probably tell you to get a newer version of flight controller.)

The Mission Planner esc calibration method normally works.
Using the manual method you should be following the exact steps described here.
I noticed you pushed the safety switch after the first battery connection, but the instructions don’t say to do that. It might not matter at all. The fact you are not getting the expected tones is a problem.
BTW, I don’t recommend plugging in all UBECs - only one - although you don’t need any unless you plan to use the servo rail to power up a device.

When you calibrate the radios with MP, what pwm values are shown?
When connected to MP what messages do you see when you power up? Do you get a pre-arm check?
Using MP does the Motor Test routine work?
The video doesn’t show a smoke-stopper, but that could prevent motor spin-up.

If all else fails, you can try posting the question to the Ardupilot forum.

Here are some other related posts in this forum:
https://community.dojofordrones.com/t/solved-calibrating-escs-pixhawk/532/2
https://community.dojofordrones.com/t/brownout-during-esc-calibration/568/3

2 Likes

@jax200 Thank you for the reply, being a noob i just have a few questions.

  1. How would i go about verifying the transmitter sw setup as you mentioned? As when i go into the settings on the transmitter (as shown in the video also) there are many options and I am not sure what they mean :frowning: 
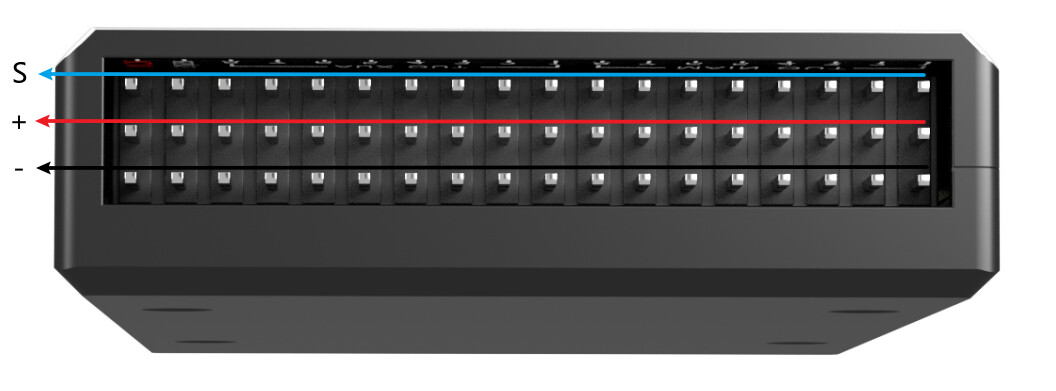
. I cant seem to find videos online that explain the correct setup for the FS-i6x transmitter with the X6B Receiver. Can you kindly assist in telling me what settings i should be setting on the transmitter and which port should i use on the X6B (PPM or i-BUS)?

  2. I pushed the safety switch after the first battery connection as the video in the drone dojo course does the same. Will it be fine if i removed the safety switch completely and then try again?

  3. When you say calibrate the radios with MP do you mean i should go to ESC calibration section in MP or the Radio Calibration section in MP? sorry if this is a stupid question but since i am a beginner i just want to make sure.

  4. When i power up MP and connect the pixhawk to the computer using USB wire i can see the GPS working correctly on the right and on the left it says “PreArm: Motors: Check frame class and type”. Using MP going to the Motor Test and selecting Test Motor A or any other options i get an error “Command was denied by the autopilot”. How should i proceed?

  5. I am not using a smoke stopper however i have noticed i have one provided. Where should i plug this in exactly as it has four ports?

Again thank you so much for the assistance. looking forward to your reply.

1 Like

It sounds like the correct firmware needs to be uploaded and the drone needs to be calibrated.
I looked at the Drone Building Tutorial video, and it seems to have left out the entire step for flashing the flight controller firmware and installing Mission Planner. Are you enrolled in “How to Build a Raspberry Pi Drone”? You should follow that video and in the Pre-Flight steps it discusses flashing the firmware.

The course includes steps for binding the X6B receiver. Also refer to the FS i6x manual (section 4.2). Finally, here also is one Youtube video that addresses it.

Using MP load the firmware and follow the calibration steps, including radio and esc calibration. Use the frame type as indicated.

Leave the safety switch. As its name implies, it’s for safety!

Include the smoke stopper in your power feed whenever powering up for the first time, or whenever you change anything to protect the electronics. Then if the system checks out remove it before you proceed further.

In addition to viewing the Drone Dojo videos you should read through the Ardupilot references.

It is also important to ensure the copter is properly tuned. The courses touch on a basic tune which should be fine for this kit, but you might want to check out this and this. The last reference is good but 3 years old, so you might want to check further.

Also learn about failsafe modes to ensure safe flight.

Let me know how it goes,.

Jack

1 Like

BTW, since you are new to drones, you should also become familiar with drone regulations in your community.

  • The US and Europe now require a Remote ID be affixed to your drone.
  • The US FAA requires that you comply with laws in US airspace, which are similar to other countries.
  • The US FAA requires that you register and display your FAA number on the drone.
  • The US FAA requires that you pass a simple online test in its TRUST program.
  • Although the FAA governs airspace, there may be other state and local rules that you need to be aware of where you are allowed to takeoff and land.
1 Like

Hey @jax200 , thanks heaps for all the help, i was able to calibrate the ESC after selecting the correct frame type, uploading latest firmware and going through the initial setup wizard in Mission Planner.

Since then i have successfully been able to pass all the pre-arm checks, arm the drone and carry out the first flight :grin::grin:

Thank you again, will definitely message you incase i need any other help in the future. You’re great. :blush:

1 Like

1 Like

Hi I am having a problem calibrating my ESC I get a single one tone beep, and even though I am on the correct frame type and firmware I never get the beeps I need for calibration. Here is a video I’ve been stuck on this issue for over 3 weeks, can someone please help!!!

Thank you!

1 Like

That indicates the proper signal is not reaching the motors.
What are the esc and fc you are using?
What is the firmware version used?
Did you try using the MP method for esc calibration?

1 Like

I am using the PIX 6 Flight controller, with Hobbywing xrotor 40A ESC. I have tried using the mission planner calibration which is what I used in the video. For firmware I just used the Install Firmware option in mission planner. Frame type is the picture you sent in this thread to Waleed.

1 Like

What was the actual name of the firmware you installed?

1 Like

Update: I have been able to spin all the motors individually when the ESC cable is connected to Channel 3 (throttle) on my receiver. How do i get all 4 of them to spin at the same time and have the ESC cables connected to Main out 1-4 on my flight controller. When i tried that they didn’t spin.

Here is the video this should make sense hopefully :crossed_fingers:

1 Like

You still haven’t provided the fm name. Regardless, here are some considerations.

Mismatch for BDShot: If you are trying to use the Pixhawk 6X-bdshot firmware, but the ESCs are not flashed with BDShot-compatible firmware (like BlueJay or specific BLHeli_32 versions) or are not configured for BDShot, then the FC will send BDShot signals that the ESCs don’t understand, resulting in no motor spin.

Incorrect ArduPilot Parameter Configuration: This is the most frequent and firmware-related issue. ArduPilot needs to be explicitly told what kind of signal to send (PWM, DShot150, DShot300, DShot600, BDShot, etc.) on its motor outputs. If this parameter doesn’t match what the ESCs are expecting, they won’t respond correctly.

Recommendation
1 Reflash confirming you have correct firmware.
2 After re-flashing and connecting, go to Config/Tuning > Full Parameter List.

Identify your ESC Protocol:

For DShot/BDShot (Most Likely for 4-in-1s):

Search for SERVO_BLH_OTYPE. Set this to match your ESC’s DShot capability (e.g., 4 for DShot600 is a good starting point if unsure, as many modern ESCs default to this). If you are specifically trying to use BDShot with the pixhawk6x-bdshot firmware, ensure this is set to a BDShot option (6 or 7).

Search for SERVO_BLH_MASK. For a standard quad using Main Out 1-4, set this to 15 (binary 0b00001111).

For PWM (Less Common for 4-in-1s):

Search for MOT_PWM_TYPE. Set to 0 (Normal PWM).

Search for SERVO_OUTPUT_RATE. Set to 400 (for standard 400Hz PWM) or 50 (for 50Hz PWM).

Click “Write Params” to save these changes.

Go through the MP calibration procedure again. Then perform Motor Test.

1 Like

Thank you, I believe it is PWM signals and it’s not Dshot or BDshot. In mission planner it said install firmware and did not give me a name for the firmware which is why I didn’t know what name to give you. Also my flight controller is a Pix6 not the pixhawk.

Ok Ensure your output wires have the proper orientation on the FC:

Going back to my initial assumption, the firmware is probably not correct. You should be using this:

ArduPilot firmware : /Copter/stable-4.6.1/RadiolinkPIX6 https://share.google/iaHEdLAxALXJwoIxN

1 Like

I installed the same firmware you listed and it said “No need to upload. already on the board” After which I checked the two parameters you listed above as well. After connecting the one of the ESC’s into output 1 on the flight controller (tried outputs 2-4 as well) I am still getting the one tone beep, which you said means its not receiving the signal.

1 Like

The only two other things I can think of are that the receiver wire is not connected correctly (SBUS?) or there is an issue with the FC. Do you have another FC to swap in? If that doesn’t help you might post your issue to the Ardupilot discussion forum.

1 Like

Okay Great news all 4 motors are spinning at the same time! I changed the servo outputs for channels 1-4 to RCin3 which is the throttle input from the receiver. However, I am worried that this will mean only the throttle will work when I go to fly my drone. When they were on the settings of motors 1-4 for each channel there was no PWM value they were all at 0 and wouldnt spin. Please let me know. Thanks!

1 Like

That just bypasses the FC (ie, do not fly). Since you confirmed the fm, it still seems like an SBUS issue. It looks like you are using a Radiolink receiver. Here’s some information I found browsing.

Steps to Verify Radiolink Receiver is in SBUS Mode

Check the Receiver’s LED Indicator:

Many Radiolink receivers, such as the R12DS or R9DS, use LED colors or flashing patterns to indicate the signal output mode (SBUS, PWM, or PPM). For example:

R12DS: A blue/purple LED indicates SBUS signal output, while a red LED indicates PWM output.
R6DSM: A blue LED indicates SBUS mode, while a red LED indicates PPM mode.
R12F: A blue LED (or red and blue LEDs on together) indicates SBUS mode, with channel 12 outputting the SBUS signal.

Action: Power on the receiver and observe the LED. If it’s blue (or blue/purple for some models), it’s likely in SBUS mode. If it’s red, it’s in PWM mode, and you may need to switch it.

Toggle SBUS Mode (if needed):

Radiolink receivers often allow you to switch between SBUS, PWM, or other signal modes using the binding button (ID SET button):

R12DS: Short press the ID SET button twice within 1 second to switch between PWM and SBUS. The LED changes to blue/purple when SBUS is active.
R6DSM: Press the binding button twice within 1 second to toggle between SBUS (blue LED) and PPM (red LED).
R12F: Short press the binding button once to turn SBUS on/off (blue LED indicates SBUS is on, with channel 12 outputting SBUS).
Action: If the LED indicates PWM or PPM, press the binding button as described to switch to SBUS mode and confirm the LED changes to blue (or the appropriate color for your receiver).

Remember also to turn off the Pix6 safety switch before the MP Motor Test if it is enabled. It can be disabled in the ARMING_CHECK.