I’ve built a drone with the kit (rasperry+pixhawk), I completed the building course, and now I’m doing the programming course (my target is to go for the precision landing course).
I could successfuly calibrate ESCs, and I have two dev environments (one built from scratch, and one from the provided .iso, both running with recommended versions, on ubuntu 18)
When I connect the pixhawk thru USB, I see several “arm pre checks errors” on QGC logs, some of them seem to be because it is connected thru usb (like wrong voltage range).
So, I want to connect QGC to my drone thru wifi, and here is where I’m lost…
1 - I read about launching mav with master=/dev/ttyAMA0, but I don’t have this device on my virtual machine…
2 - I don’t know the steps to this device being created…
3 - I saw a wifi network when I power my drone, but when I try to connect there, it fails trying to connect… don’t know why (logs says "state change: config failed (reason ‘ssid-not-found’, sys-iface-state: ‘managed’))
4 - I saw another video, on “Drone engineering camp 101” course, here it talks about connecting the raspberrypi to the computer throu HDMI to be configured… and setup wifi connection there… followed by MissionPlanner software installation… really lost the relation between this course and the programming one… which is the right path in order to build a delivery drone, managed by an external system ?
And configured the port in raspi-config?
What does ls /dev/tty* list?
“…really lost the relation between this course and the programming one… which is the right path in order to build a delivery drone, managed by an external system…”
The Programming Course teaches you how to create flight programs and load it into the SITL or RPi.
It is best to first become familiar with, and test your programs in, a SITL before going into the field.
The above Build course obviously teaches you how to build a basic drone with a companion computer which contains the flight programs.
After you understand these fundamentals, take the ‘Drone Delivery and Precision Landing’ course. I am not sure what you mean by ‘an external system’, but there are various methods to control and monitor you drone operation while in the field, which the Precision Landing course will address. You will no longer have your home LAN to use for communicating with your drone, so there are other methods to accomplish this.
There is also a video by which you can use a cellular network to communicate with the drone.
Also, I would recommend starting to update to python3 and later versions of Ubuntu (22.04, 24.04) when you feel up to it. I currently fly autonomous missions using Ubuntu 22.04 without using a virtual environment.
The last two makes me some confusing, becouse the have some overlap… the raspberrypi configuration is one point… the “build raspberrypi drone” course does the configuration by connecting the raspberry throu a HDMI cable (I don’t have one right now), while this video does it by burning a rasbperrypi litle OS in the micro SD card, and configuring the wireless connection on wpa_supplicant.conf, and rebooting the raspberry (I did it checking every step several times, and didn’t work for me… no new device connected to my router when power on the drone…).
You are giving me a lot of information…
I need to know the right way to connect my raspberrypi to the LAN
I’ll focus on SITL before trying to command my drone
I’ll upgrade to python3, on my local gentoo system, without virtual envirnoment.
I’ll take the “precission landing delivery” course
Note: with “external system” I’m talking about our logistic solution (www.fletti.com), which handles delivery requests thru a group of drivers (the thing is to be able to take some of these requests by the drone, eventually). All this works based on http requests (between the system and the drivers).
So, “the drone” should be able to act as a driver with a cellphone:
A few comments Matias.
1 I am unclear how you are using an HDMI port. Are you connecting to a display? Could you reference where you see that?
2 In the future I suggest using the Raspberry Pi OS app .
3 I don’t have experience using Gentoo, so uncertain how it will work with the set up dependencies.
4 I suggest you become aware of your local drone laws. Flying Beyond Visual Line of Sight (BVLOS) is normally illegal without special permission.
The HDMI is used to connect to a screen so you can work with the code. It is not needed using ssh from your PC.
Using QGC or MP is a personal preference. I normally use MP as I find it easier to use, has much more support, and they update with features more often.
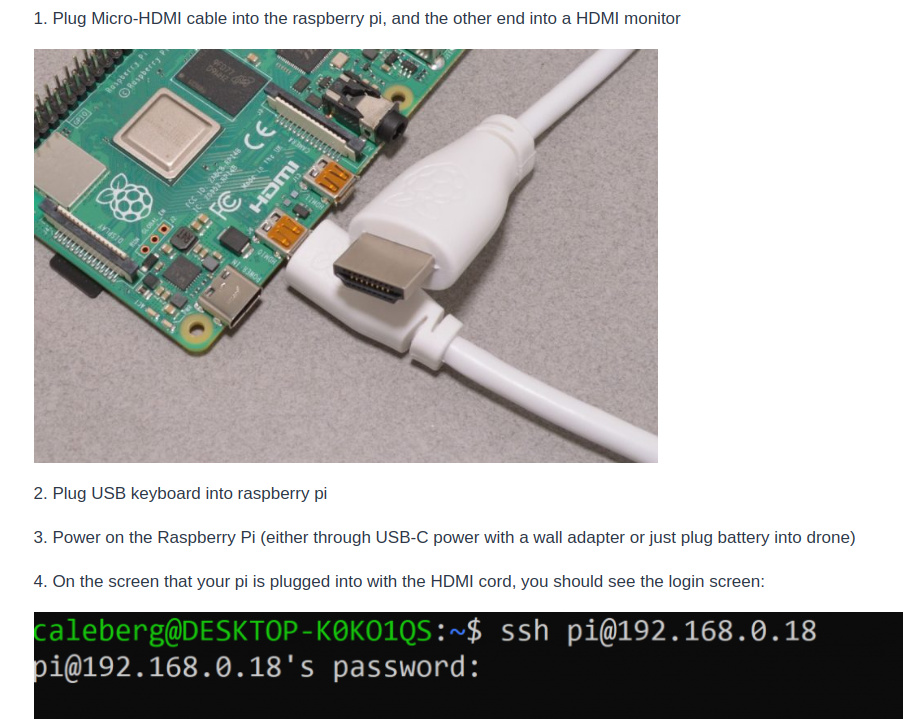
1 - connecto the raspberry to a monitor
…
4 - you will see a login screen ← it is confusing, because a ssh login has no sense to be shown on the reaspberry, but it should be on my laptop monitor when trying to sshing… am I right?
Great! It is not working the WiFi configuration… I just put the wpa_supplicant.conf in /bootfs/ as I see in the video and in /rootfs/etc/wpa_supplicant as it was originally after burning the image…
So I’ll try with the hdmi cordon I bought… setting the WiFi trhu rpi_config… as shown in the course…
× This environment is externally managed
╰─> To install Python packages system-wide, try apt install
python3-xyz, where xyz is the package you are trying to
install.
If you wish to install a non-Debian-packaged Python package,
create a virtual environment using python3 -m venv path/to/venv.
Then use path/to/venv/bin/python and path/to/venv/bin/pip. Make
sure you have python3-full installed.
note: If you believe this is a mistake, please contact your Python installation or OS distribution provider. You can override this, at the risk of breaking your Python installation or OS, b
y passing --break-system-packages.
hint: See PEP 668 for the detailed specification.
matias@raspberrypi:~ $
I think it is something about python version… but don’t have too much experience on this… is there a newer post?
Sorry for my python related question, I was researching and I understood the issue, the correct way to handle it is by creating a virtual python environment:
What version of python are you running? It is my understanding with versions 3.12 and newer there might be package management conflicts that manifest as that error. One workaround is to use the following statement for each package. In this example I have added mavproxy and pymavlink.